Wednesday, November 23, 2011

what i wore.

pretty much anything with a blazer. love that look and its so classy you can buy a million blazers & they will never go out of style.


1- top, old navy; undershirt, HcO; blazer, target (about 5 yrs ago); jeggings, HcO.

2- top, lauren conrad; undershirt, HcO; jeggings, HcO. blazer, buckle; clutch, coach; shoes, jessica simpson. 


      • guess there is a clause here that should say not only do i love blazers, but i guess i'm lovin' the jeggings too! <3

things i'm lovin' this week.

1- celebrating my best bud's year anniversary of becoming a hairstylist! (& she is the best!) how could you not love going out on the town with awesome people!? Also, really diggin' the skinny girl line of beverages.


 2- trip over to the hemitage. (tourist style!)


3- lunch @ the frothy monkey. best coffee -- bourbon smoked. best sandwhich -- pimento. yum!


Wednesday, October 19, 2011

furniture restoration projects.


PROJECT #1: 

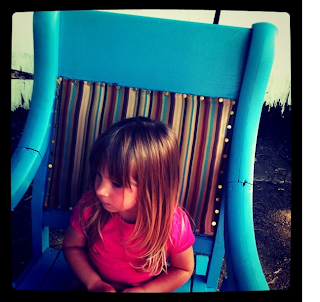
Recently, while cleaning out the garage, which is currently a combination garage sale/ antique store, we came across an old rocking chair that needed an intense amount of work. We decided this would be a fun activity to do as a family because Madeline’s room lacked a rocking chair. It was definitely an experience to say the least!
We started by cleaning it off with the hose, which was done mostly by my daughter Madeline and ended with all of us looking like we had been hit with Super Soakers. However, she had a blast and got the job done!


After the chair looked spic and span, we sanded it down. My husband, who is definitely the repair guru around the house, got out some tools, and so did Madeline, and they reestablished the frame and the arms of the chair.  At this point, we were getting closer to it being ready to rock!


Sharing Daddy’s tools!


Next came the really entertaining part…the paint job! We went together and chose a light blue color that was similar to the original color of the chair and proceeded home to make a serious mess on the driveway. We all grabbed a brush and went to work! I really think just as much paint ended up on Madeline and the driveway as it did the chair, but she did a really impressive job for only turning three years old a few months ago!


It was a sad moment for Madeline when the chair was all painted because she could have put about 100 more coats on it, but it was time to move onto fabric options. We headed to Hancock Fabrics and chose the material and pattern we wanted for the seat cushions. We ended up leaving with a vintage striped pattern, but it wasn’t without a fight over Thomas the Train fabric. Oddly enough, even though times have changed since the 1950s, I was once again showed up by my husband on what should be the female aspect of this project, which was sewing the fabric onto the cushions. However, I am not going to put myself down because I am excellent at holding and handling the material and giving it to my husband as needed, if that counts!?


The finished product turned out much better than I thought it would from the looks of the chair at the start of this endeavor. Since we were able to reuse this chair for furniture in our home instead of sending it to the landfill, it was a green as well as a fun project to do as a family. Plus, I mean seriously a nursery is never complete without a chair to rock them to sleep in!

If you want to restore your own rocking chair, or any piece of furniture, and you haven’t given birth yet, it is still a great way to spend time with your significant other doing something that is more or less a little bit of a “man thing.” The payoff for your hard work is that you get the traditional rocking chair for your nursery or child’s bedroom at around $30 versus the high costs at the store buying new and you have made something that you can eventually pass down to the kids.


PROJECT #2 -

Got this twin bed frame for free for helping a friend out and it needed quite a bit of work. Here we go on our second furniture restoration project!

This is the frame as is. Needed some slight repairs, a good sanding, & a nice paint job --

20111013-172012.jpg

First off my wonderful handyman of a husband fixed a broken piece with some wood glue. Wood glue is perfect because it does not expand & can be painted as well as sanded after drying (which is quick) --
20111013-172555.jpg

20111013-172618.jpg

Next came the sanding part, which was by FAR the worst part considering this piece needed quite a bit --

20111013-172707.jpg

Then the fun part! Painting! I used light blue paint (same color we used for our hallway -- can we say reuse & recycle!?) because our daughter's favorite color is blue & we will be decorating her room with the hungry caterpillar by eric carlyle.  Did I mention Ball jars/mason jars are perfect for storing paint?!

20111013-172934.jpg


20111013-173026.jpg

And of course after the paint dried, we have a finished product! Can't wait to set it up in Madeline's room with her new bed set! --
20111013-173510.jpg


SHARE your furniture restoration projects! I would love to see them! <3


things i am lovin' this week.


1- made some halloween treat bags for Mady's dance class. They loved them, especially since they were personalized with their names on them!


  • Materials: 
    • Purple Bags (as many as you need
    • Large size googly eyes
    •  Gold glitter glue
    • Green squeeze (fine tip lid) paint
    • Black squeeze (fine tip lid) paint
    • Orange paint
    • Hot Glue Gun
      •  put names on in Gold Glitter Glue. Do on all bags. (make a decision according to name - whether to do at an angle or across the bag)
      • after mostly dry, carefully paint pumpkins (basically circles, but you don't have to be exact -- it is a pumpkin after all)  in appropriate spots ( so the googly eye will have room later). Have to make a decision according to the length of the name.
      • Let mostly dry, then hot glue LARGE googly eyes on the bag.
      • Once all paint is completely dry, which should not be long, since you don't need to use a lot, accent gold glitter with green (I used a hunter green for depth), to the names and tops of pumpkins. I made a little cap and vine on the pumpkins in addition to the name accent.
      • Add black accent to the pumpkin. Again does not have to be perfect, its a pumpkin. LOL I basically traced the pumpkin and added some lines in the middle.
      •  With your finished product, tie orange ribbon at the top and add candy. We are putting a ring pop, small bag of M&Ms, a sucker, and some halloween bubbles (super cheap to grab at a local dollar store!)


2 -  pumpkin' pickin'!(and you can just consider 3 & 4 as lovely fall weather & baked pumpkin seeds!)


Tuesday, September 13, 2011

(recipe).

I created this jam recipe and we named it the "papaya express." (get the reference?! LoL) We used papaya, apple pears, & blackberries that we got off the produce clearance cart (which I am now obsessed with by the way) and the total for all I needed was around $4.50 (great deal!)  It is a very simple freezer jam recipe & can be completed without actually canning anything.

Papaya Express Freezer Jam

2 containers of blackberries
1 whole papaya (cored, sliced, & peeled)
5 apple pears (cored, sliced, & peeled)
3 1/2 cups of sugar

1. Add all ingredients to a large pot and bring to a boil. Boil till everything is soft.
2. Blend in food processor.
3. Add 1 pk of Pectin
4. Put into freezer jam jars (you can get them at your local grocery store over near the ball jars)
5. Put in freezer or refrigerator (it will last a year in the freezer & 3 weeks in the fridge)

Enjoy on toast, bagels, or even as a marinade!It is also great on peanut butter (or almond butter) sandwiches.

Wednesday, August 24, 2011

things i am lovin' this week.


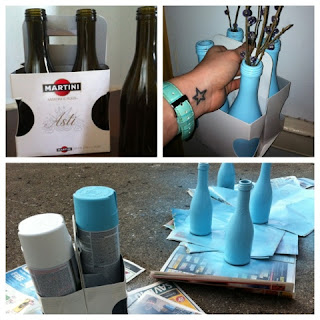
1- DIY case of vases. Saw the original idea on what else other than pinterest of course, so I had to try the project of making a "case" of vases out of mini bottles and spray paint.

  • Materials: 
    • mini champagne bottles (or four pack of any type of bottles)
    • spray paint (your choice for colors)
      • drink up, clean off the stickers on the bottles, & spray paint! boom, done, easy. <3


Sunday, August 14, 2011

things i am lovin' this week.


1 -currently have started making some handmade rings out of various items such as buttons, vintage pins, etc.

  • Materials:
    • hot glue gun
    • buttons, pins, guitar picks, etc.
    • pack or two of rings from the craft store
        • All you need to do is take a ring formation and glue on your button or pin.
          • If you are using vintage pins (the best place to get these are flea markets), you have to remove the back of the pin and sand it down (my hubby came in handy for this part!)      


2-  our trip to hubers for peach pickin'! (which wouldn't have been complete without some wine!)


Thursday, July 28, 2011

things i am lovin' this week.


All the things I am loving this week are right here in this bag, the perfectly packed beach bag. I am armed with some great products (including my ole henrickson sunscreen, sugar lip balm with SPF, and some extra "look good naked" tan towels"), my new black bikini, and my sunnies ready to hit the beach (and did I mention it will be my daughter’s first time @ the ocean!?).Hilton Head Island, here we come!


Saturday, July 9, 2011

things i am lovin' this week.


1 - working the merch booth for a Grammy nominated band -- the civil wars! <3 They have the most harmonious melodies and haunting songs unlike that of anything else out there! Had the wonderful opportunity to meet them in Louisville & seriously recommend their music to anyone who has eardrums that appreciate more than the same old thing.Then it was hitting the town (Indianapolis) after the show! <3


20110719-044608.jpg


2 -  camping @ the lake for july 4th. pretty cozy camping when you're staying in a rustic cabin, but hey it's secluded (as in no cell service) ok?! LOL


3- making my very own feather hair clip.got frisky and decided to try it & turned out pretty cute.
  • Materials (cost is around $11 if you don't already have hot glue, etc): 
    • Hot glue gun
    • large button (any color/style)
    • felt
    • alligator clip (or a bobby pin)
    • feathers (any color/style)
        • cut the felt to be the same size as the button and glue alligator clip to the back
        • then choose your feather & trim if need be and glue to other side of the felt
        • finally, glue your button on top and VOILA!  


Sunday, May 1, 2011

call me carrie bradshaw.

Today begins a revamp of my blog. It totes needed some updating. I think blogger is actually a little difficult to navigate, or maybe that it's the fact I am using the same Apple laptop I purchased my sophomore year of college back in 2005 (hence the title of this post). Not sure, but either way I probably won't be doing a whole lot today to avoid becoming overly frustrating which may result in a compulsive shopping trip of some kind.

If you have visited my blog before & wonder, where did all those awesomely inspirational posts go? Well, they will be back and better than ever once I get my vision for this blog where I would like it to be. :)

If you happen to be a first timer, a little snippet of what you might find here on Love SarahBella is a sort of ADHD mix of delish recipes, pinterest inspirations, crafty tutorials, fun fashion jazz, & some of my random whatevs. (oh & there will be random times when I discuss some couponing because I'm not as good as those EXTREME coupon ladies, but I do pride myself on some of the deals I get!)

So, to end this first post of the better than ever Love SarahBella blog, I shall leave you with a "cheers" to the weekend with a pic of my adorable kitty, Gatsby. And yes, the Great Gatsby. (he has been a little sick this week because I think he finally ate one of the hot peppers from the garden -- he has a vendetta against them for some reason & I believe he tried to annihilate one like it was a bug. Oops.)