PROJECT #1:
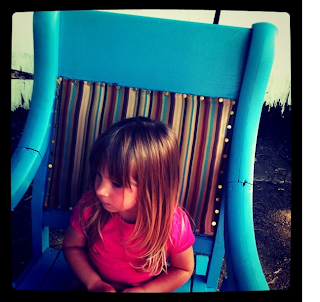
Recently, while cleaning out the garage, which is currently a combination garage sale/ antique store, we came across an old rocking chair that needed an intense amount of work. We decided this would be a fun activity to do as a family because Madeline’s room lacked a rocking chair. It was definitely an experience to say the least!
We started by cleaning it off with the hose, which was done mostly by my daughter Madeline and ended with all of us looking like we had been hit with Super Soakers. However, she had a blast and got the job done!
After the chair looked spic and span, we sanded it down. My husband, who is definitely the repair guru around the house, got out some tools, and so did Madeline, and they reestablished the frame and the arms of the chair. At this point, we were getting closer to it being ready to rock!
Sharing Daddy’s tools!
Next came the really entertaining part…the paint job! We went together and chose a light blue color that was similar to the original color of the chair and proceeded home to make a serious mess on the driveway. We all grabbed a brush and went to work! I really think just as much paint ended up on Madeline and the driveway as it did the chair, but she did a really impressive job for only turning three years old a few months ago!
It was a sad moment for Madeline when the chair was all painted because she could have put about 100 more coats on it, but it was time to move onto fabric options. We headed to Hancock Fabrics and chose the material and pattern we wanted for the seat cushions. We ended up leaving with a vintage striped pattern, but it wasn’t without a fight over Thomas the Train fabric. Oddly enough, even though times have changed since the 1950s, I was once again showed up by my husband on what should be the female aspect of this project, which was sewing the fabric onto the cushions. However, I am not going to put myself down because I am excellent at holding and handling the material and giving it to my husband as needed, if that counts!?
The finished product turned out much better than I thought it would from the looks of the chair at the start of this endeavor. Since we were able to reuse this chair for furniture in our home instead of sending it to the landfill, it was a green as well as a fun project to do as a family. Plus, I mean seriously a nursery is never complete without a chair to rock them to sleep in!
If you want to restore your own rocking chair, or any piece of furniture, and you haven’t given birth yet, it is still a great way to spend time with your significant other doing something that is more or less a little bit of a “man thing.” The payoff for your hard work is that you get the traditional rocking chair for your nursery or child’s bedroom at around $30 versus the high costs at the store buying new and you have made something that you can eventually pass down to the kids.
PROJECT #2 -
Got this twin bed frame for free for helping a friend out and it needed quite a bit of work. Here we go on our second furniture restoration project!
This is the frame as is. Needed some slight repairs, a good sanding, & a nice paint job --

First
off my wonderful handyman of a husband fixed a broken piece with some
wood glue. Wood glue is perfect because it does not expand & can be
painted as well as sanded after drying (which is quick) --


Next came the sanding part, which was by FAR the worst part considering this piece needed quite a bit --

Then
the fun part! Painting! I used light blue paint (same color we used
for our hallway -- can we say reuse & recycle!?) because our
daughter's favorite color is blue & we will be decorating her room
with the hungry caterpillar by eric carlyle. Did I mention Ball jars/mason jars are perfect for storing paint?!

And of course after the paint dried, we have a finished product! Can't wait to set it up in Madeline's room with her new bed set! --
SHARE your furniture restoration projects! I would love to see them! <3
Got this twin bed frame for free for helping a friend out and it needed quite a bit of work. Here we go on our second furniture restoration project!
This is the frame as is. Needed some slight repairs, a good sanding, & a nice paint job --


And of course after the paint dried, we have a finished product! Can't wait to set it up in Madeline's room with her new bed set! --
SHARE your furniture restoration projects! I would love to see them! <3


